Greenboy3D™ Pellet Extruder now available for Order
By ordering my Pellet Extruder you will significantly contribute to achieving the long term goal of Greenboy3D:
By ordering my Pellet Extruder you will significantly contribute to achieving the long term goal of Greenboy3D:
Every filament and piece of plastic you’ve seen started as plastic pellets. While a spool of filament (1kg) costs $20 – $60, the same amount in pellets is just $3 – $8.
You can save up to 90% on printing costs by upgrading your 3D printer with my universal Pellet-Extruder-Printhead, allowing you to print directly with pellets.
More about Pellets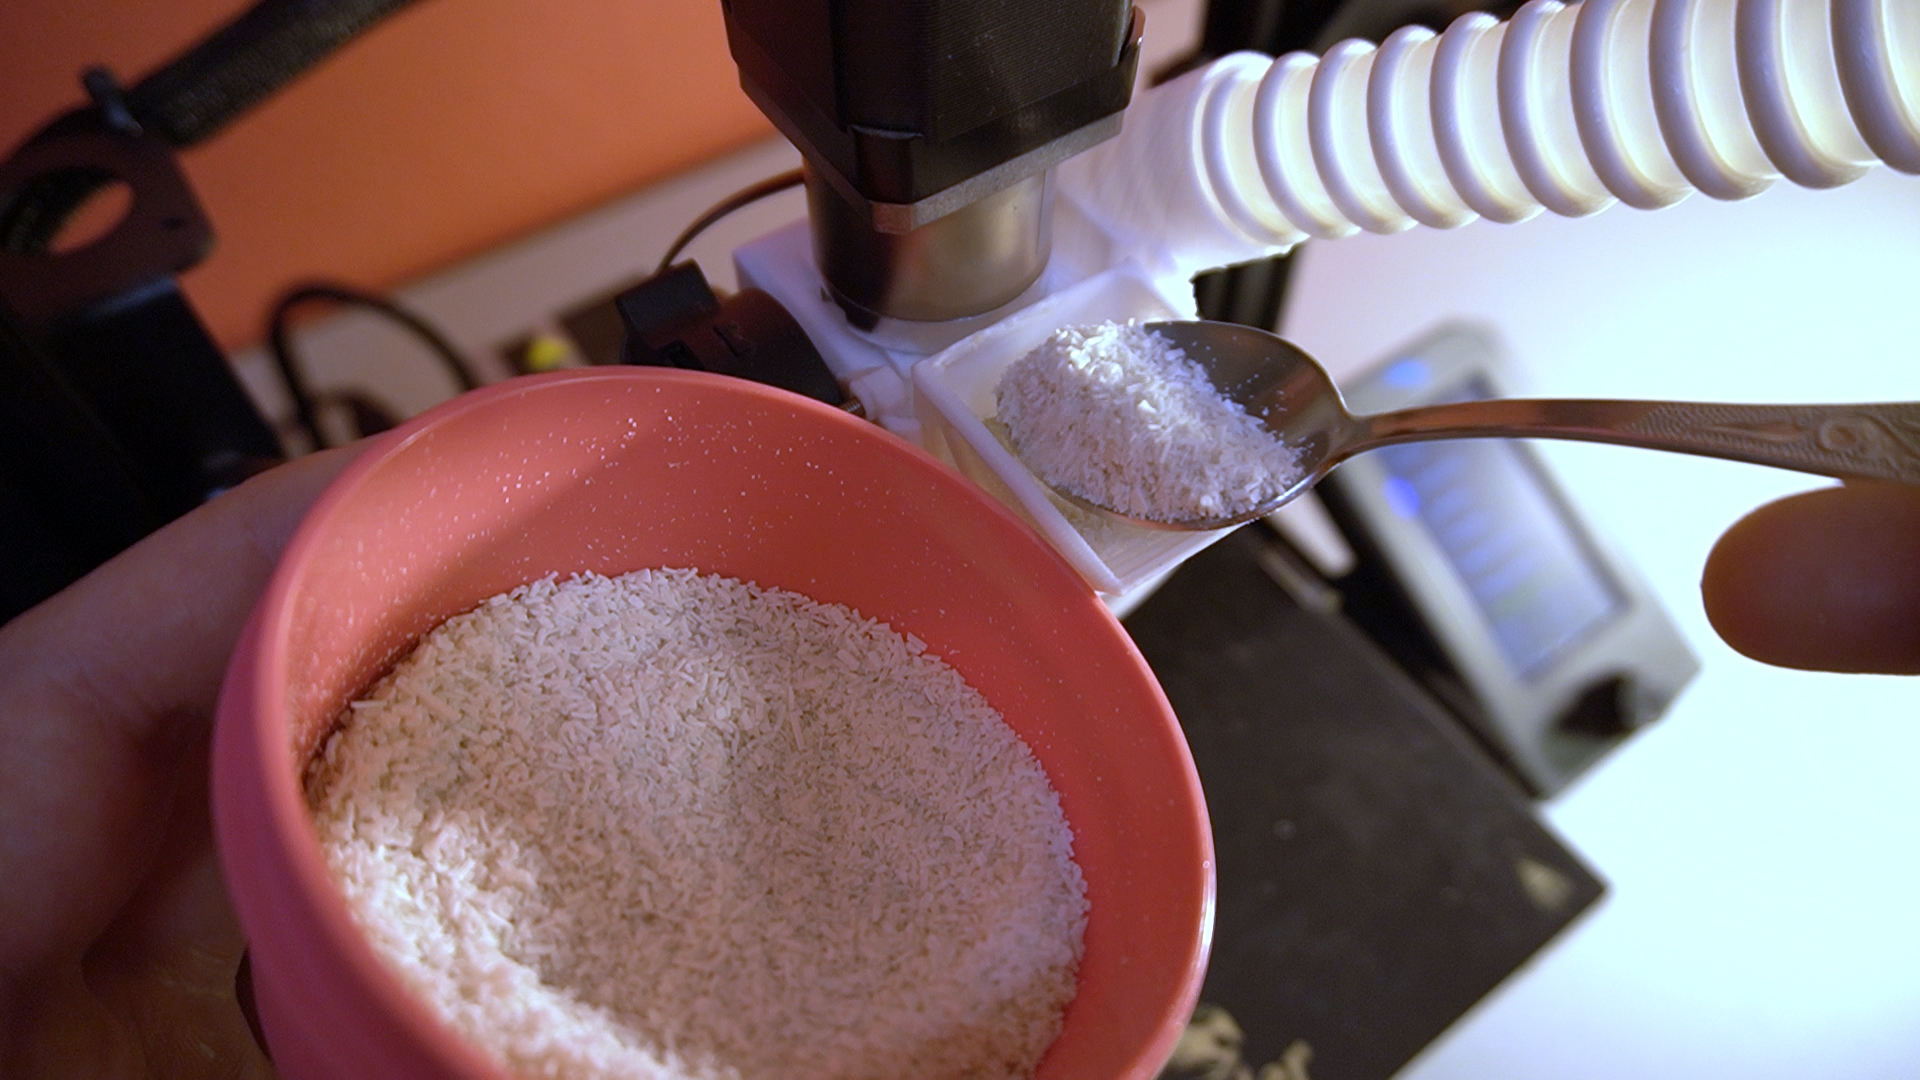
With a Greenboy Pellet-Extruder-Printhead, you can recycle any plastic waste—like empty filament spools, water bottles, yogurt cups, and failed prints—into new objects.
Simply shred the plastic into pieces smaller than 0.2 inches (5 mm) and 3D print with them again. This method offers a sustainable future, turning plastic waste into new, purposeful items instead of discarding it.
More about Recyling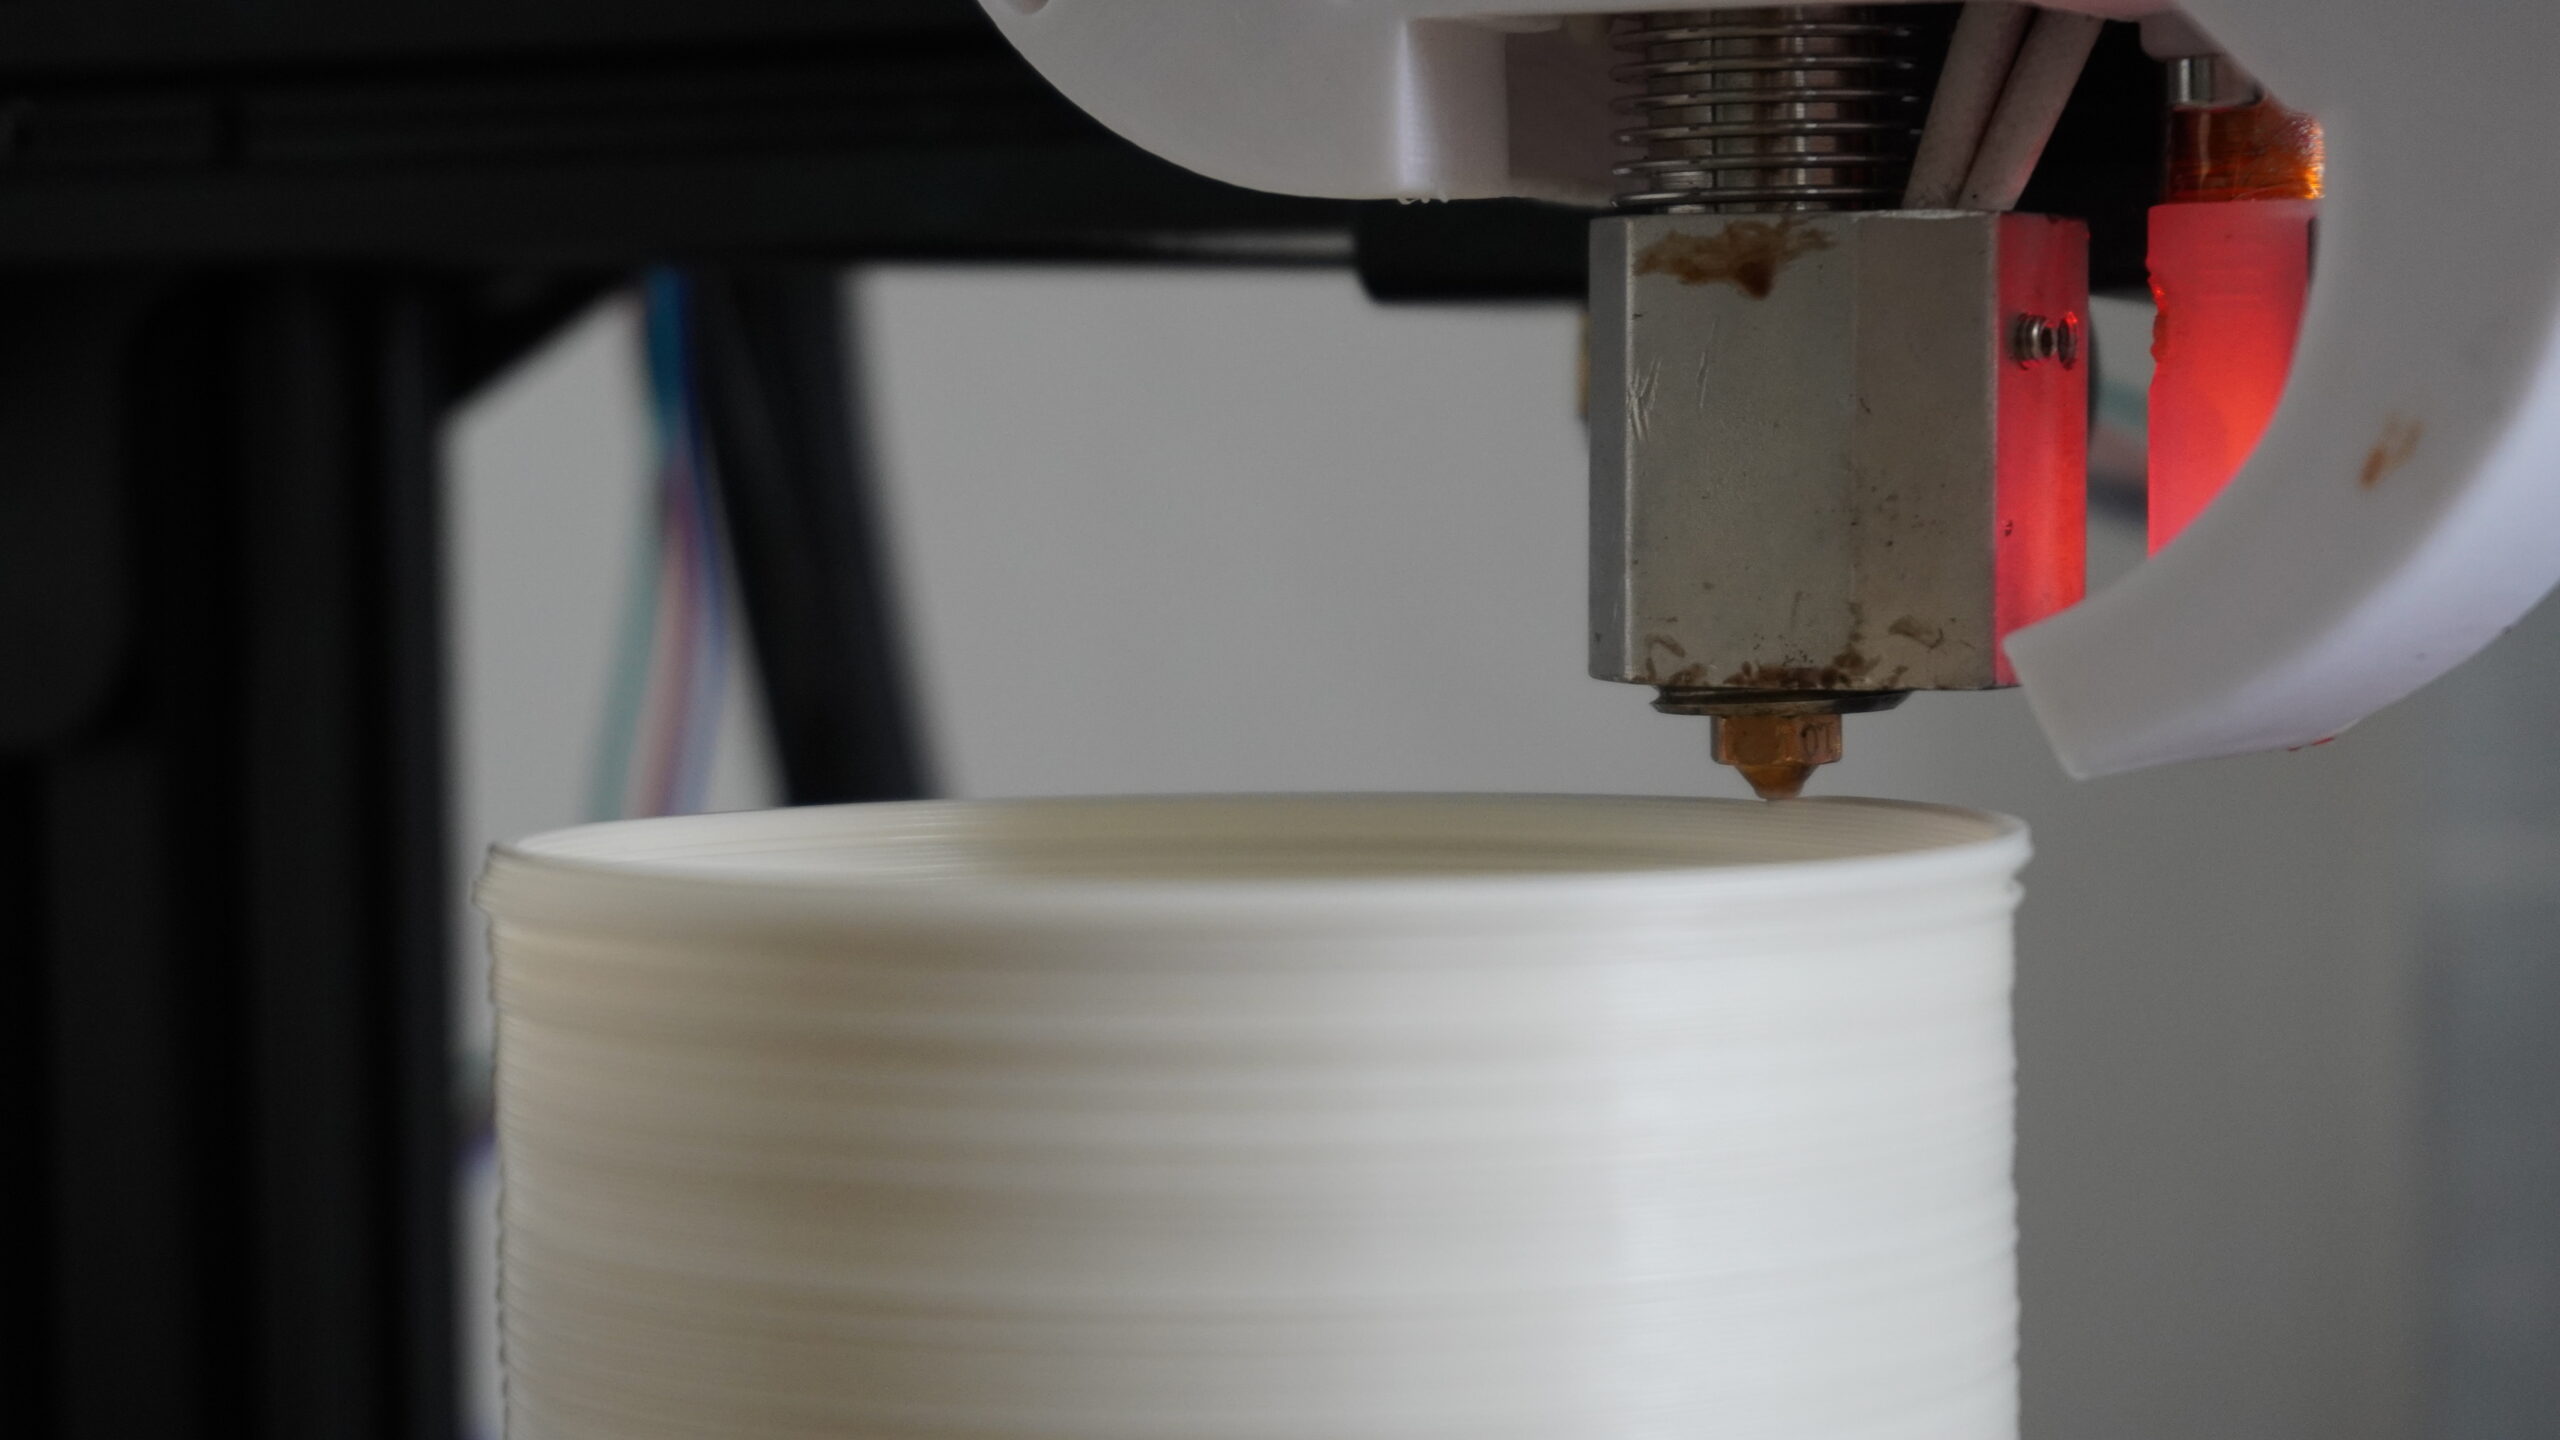
It’s true! You can 3D print chocolate with my Pellet-Extruder-Printhead. Though not originally intended, any meltable material smaller than 0.2 inches (5 mm) works fine.
For food safety, most parts in contact with food are stainless steel. If strict food safety is a priority, you can spray the rest of the extruder with food-grade silicone spray or use other methods…
More about non-plastic materialsLearn more about my Pellet Extruder, whether you can use it on YOUR 3D Printer aswell and some other topics.

Thanks to the concept of using 3D printable adapters, you can use this extruder on almost any 3D Printer
Through innovative thinking I managed to replace a lot of metals parts with 3D printable plastic parts and this significantly reduced the weight
Through innovative thinking and some new approaches I managed to reduce the production costs, which allows to have a lower price
Thanks to some special features, it is quite easy to use this pellet extruder, because many problems conventional 3D Pellet Extruders have like unloading pellets have been solved
Depending on the material you use, its size, shape and viscosity, you can expect to achieve a maximum flowrate between 125 – 200 grams per hour with a 1mm nozzle. Using a bigger or smaller nozzle does influence the maximum flowrate capabilities…
Parameter
Specification
*Upgradeable to 420°C
**Max Temperature is also determined by the heat resistance of the plastic you choose for the 3D printed Extruder parts. For example: Extruder parts out of PLA can withstand Extruder Temperatures up to 300°C but not beyond
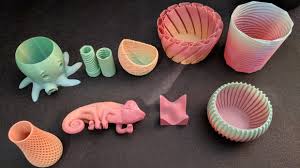
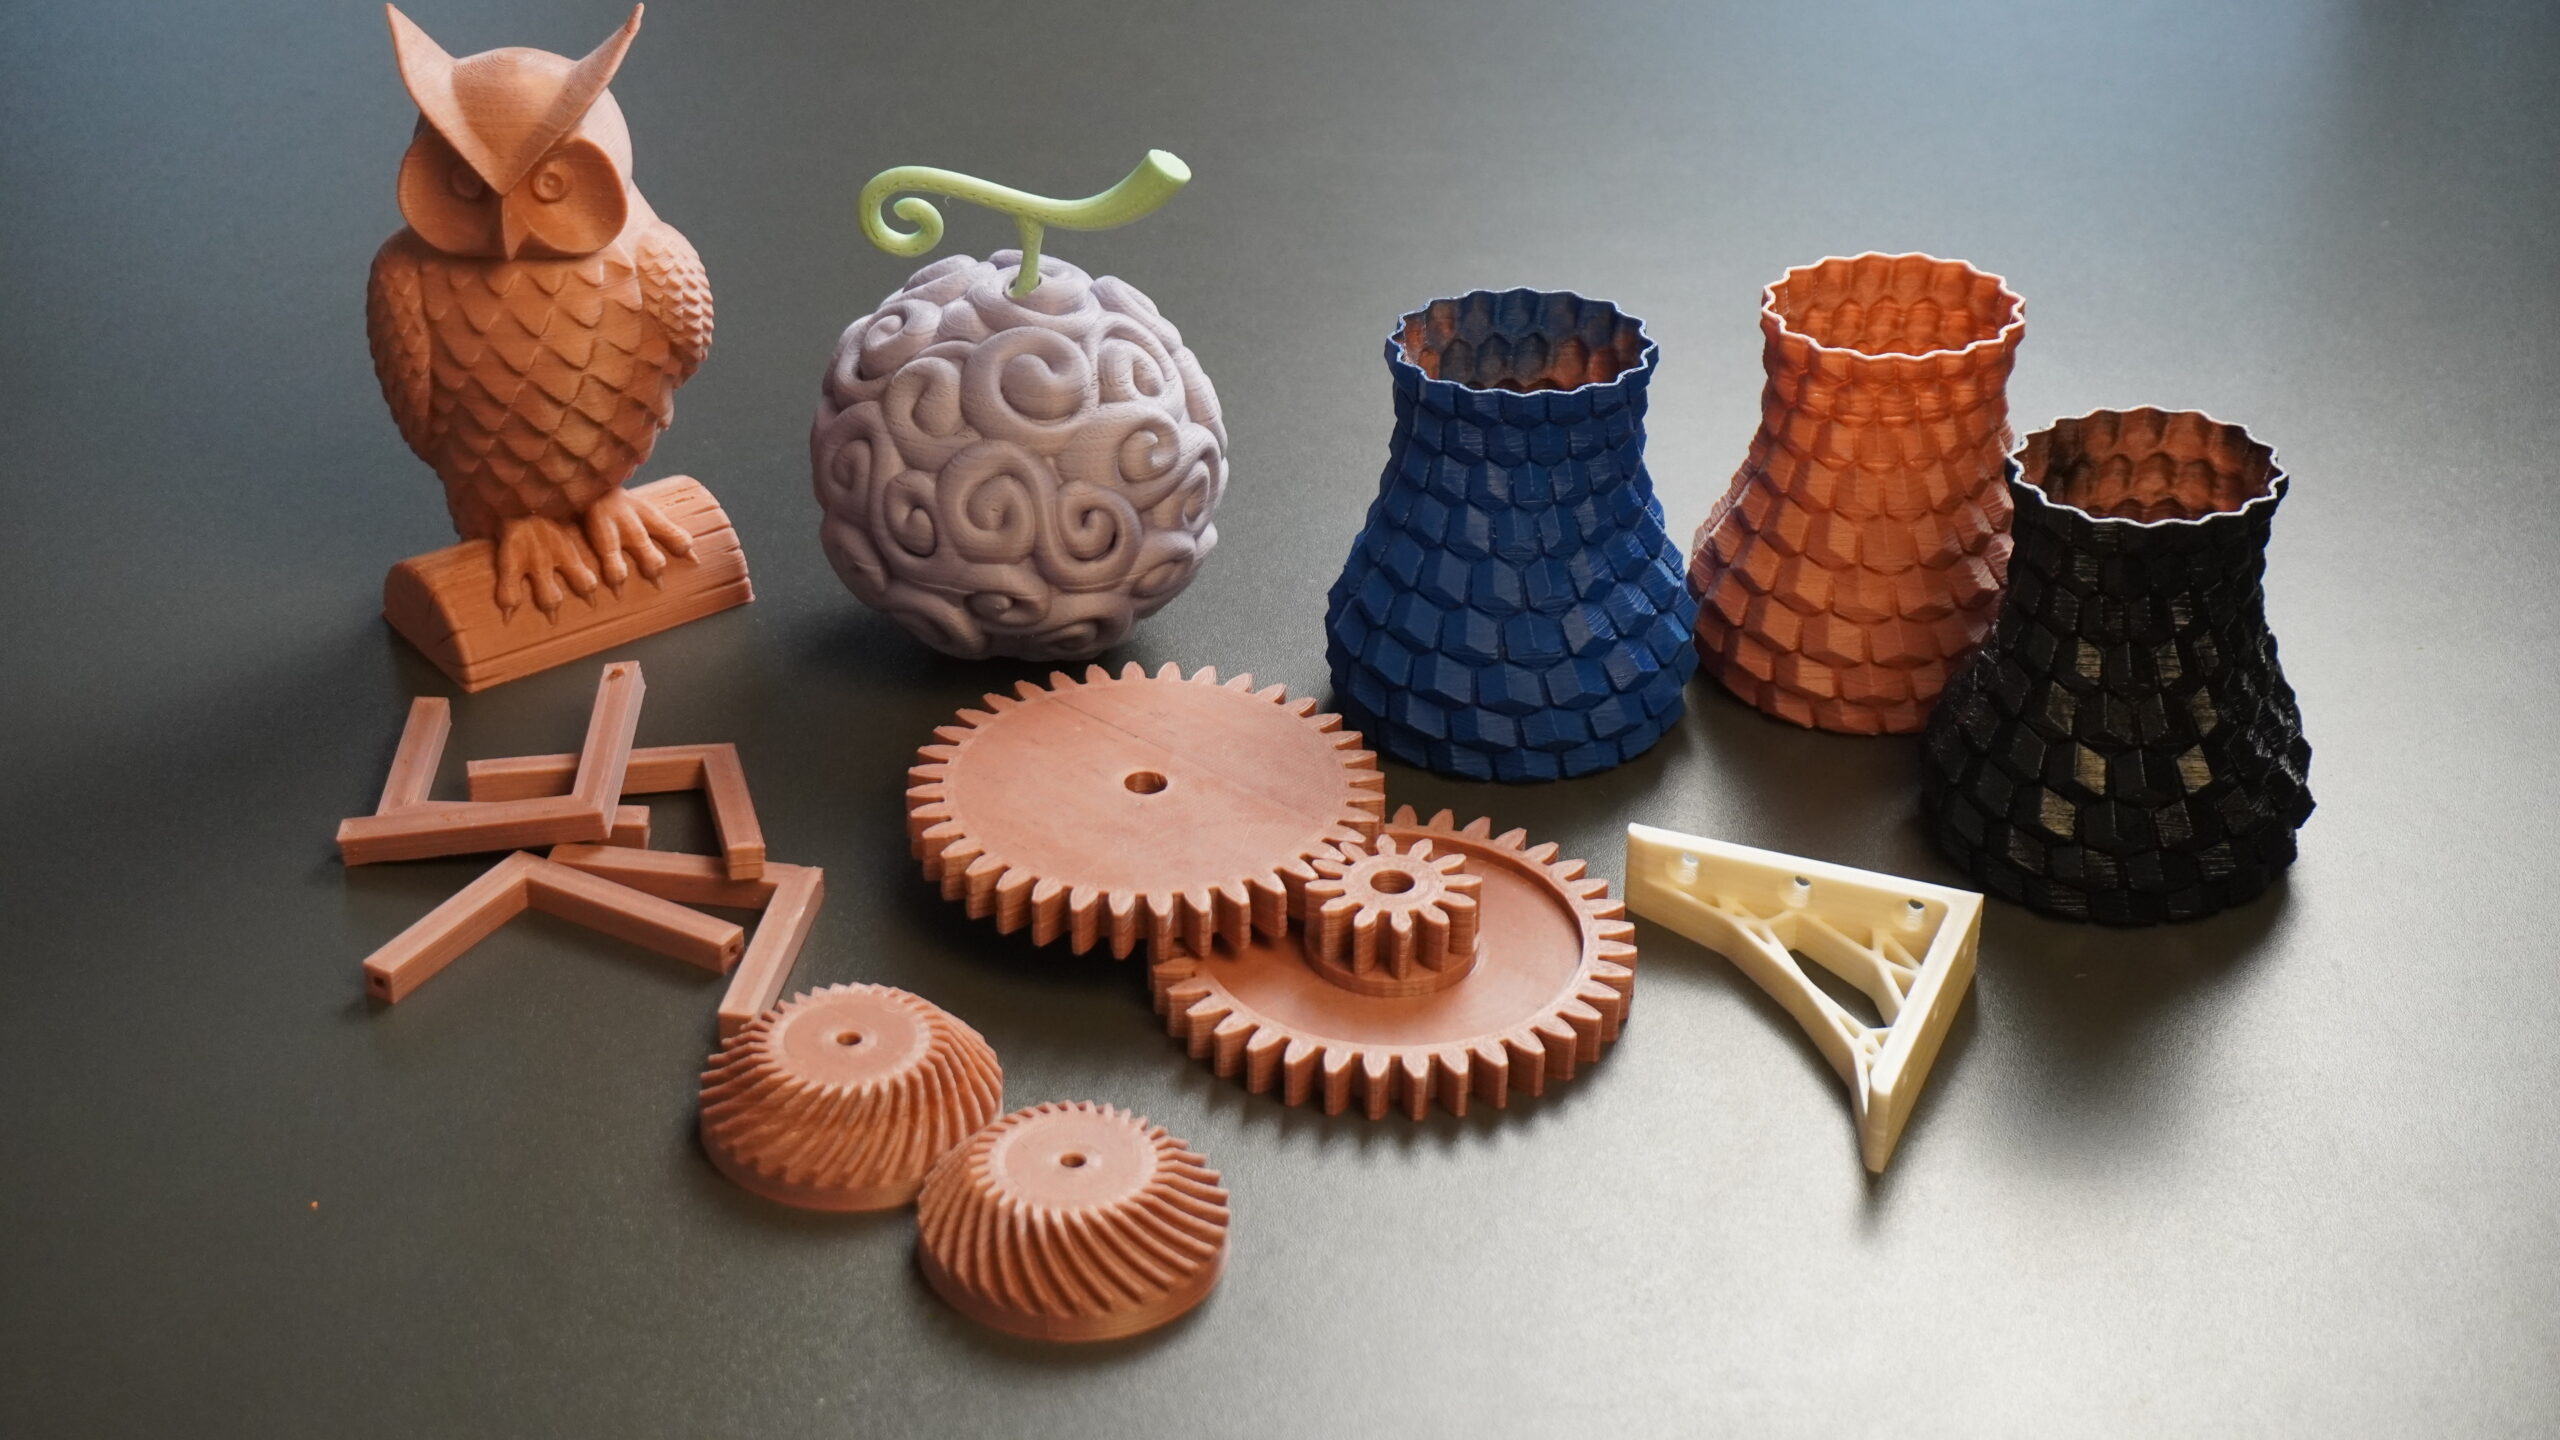
Instead of buying pre-colored filament and being limited to that color and spool, you can buy a bag of plastic pellets and some color pigments, sprays or paint.
Now you can universally print with any color you desire at a fraction of the filament cost simply by mixing a specific amount of pellets with a chosen color, which will result in, for example, 1/2 pounds of blue-colored PLA for one of your specific projects.
Depending on the concentration of colors in your pellets, you can achieve everything in the range of transparent prints with a little color and up to full-solid color prints. Another cool thing is mixing or stacking different batches of colored pellets on top of each other. This will give amazing gradient colors to your 3D prints, as you can see in the image nearby.
Apply a Color on Pellets

Mix everything by shaking
Let everything dry out

“Additives” is a word for substances that improve or change the properties of plastics. By using the same methods for coloring your pellets, you can add, for example, “glow in the dark” substances to your pellets to get cool-looking prints that glow at night. But that is just one out of many possibilities you can try out…

Back in the year 2022 I was very frustrated with the cost of 3D Printing and especially the waste it produces. At that time, I knew that 3D printing directly with Plastic Pellets & Shredded waste is possible.
But there were no low cost options, and it also seemed like as if the 3D printing industry doesn’t have much interest in developing this technology, despite its great potential.
This frustrated me even more, so I decided to develop my own Pellet Extruder without having any knowledge about engineering at that time…
For more than 2 years I struggled, worked extremely hard and spent most of my income on the development while living under poor conditions…
No matter how hard times were, I never gave up and this why Greenboy3D exists today…

Yes, retraction works with my Pellet Extruder similarly as it does with Filament Extruders, by reversing the Extruder Motor direction.
There will be “ready to use” slicer profiles and guides that will teach how to find the right slicer settings for you individual usecase.
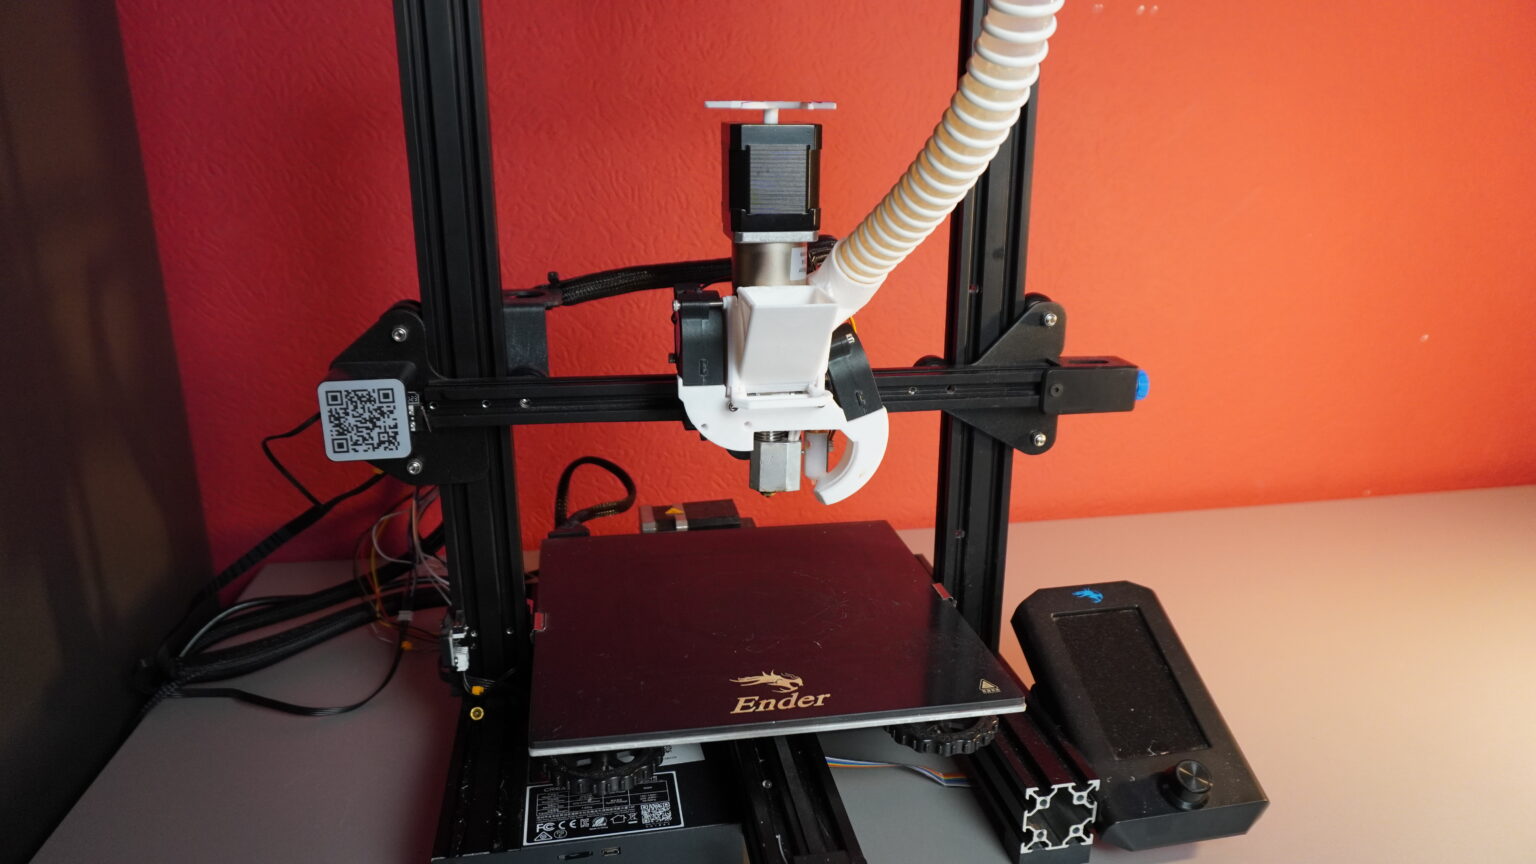
The Greenboy Extruder is compatible with almost any 3D printer featuring a printhead with a heating element, temperature sensor, and two cooling fans, as these can be swapped with those on my Pellet Extruder. The key factor is connecting the Pellet Extruder to your printer’s gantry.
Here you have two options:
1. Use one of my 3D printable adapters for various printers from the “Available-Adapters-List” below. Download and print the appropriate adapter to seamlessly attach the extruder to your printer.
2. In case your printer has a custom mountplate, you can easily create your own adapter. A detailed video tutorial will soon be available to guide you through making a custom adapter without any prior CAD skills
Current Available-Adapters-List (more will be added):.
New Adapters for the 3D printers from Creality, Prusa and Elegoo are already planned.
Additionally, I find it necessary to make a survey where people can tell for which 3D printer they would like to have an adapter. Based on that survey, I can create a list ranked with the most requested 3D printers and create additional adapters starting with the most requested ones
All 3D-printable files, including all adapters, will be freely accessible and downloadable on my website shortly before shipping begins, as I want to give them a final touch-up before release.
I created the Greenboy Pellet Extruder so that it can be used as a printhead, but it of course can also be used as a “Filament Extrusion Machine”. That is up to you.
Yeah absolutely,
There will be many guides and tutorials that will show you how you can do that and what you need to know about recycling plastics…
I will make detailed video guides and tutorials regarding this in the near future, and share all my “pellet” knowledge with you…
Between 0.5 to 5mm
Depending on the material you use, its size, shape and viscosity, you can expect to achieve a maximum flowrate between 150 – 250 grams per hour with a 1mm nozzle. Using a bigger or smaller nozzle does influence the maximum flowrate capabilities…
Yes absolutely! The only limit is your creativity
In theory, yes, although there are a couple of things you need to consider if you plan to eat your 3D Prints.
The metal parts that would come in contact with the food are food safe metals like stainless steel and aluminum. But I can not control out of which plastic you 3D print the necessary plastic parts for the Pellet Extruder, and whether your local regulations would call those 3D prints “Food Safe”.
There are ways to make your 3D prints more food safe like spraying “Food-Grade Silicon Spray” on them or, even better, dipping them in uncured Food-Grade silicon and letting the silicon dry out. This would give your 3D printed parts a smooth food safe surface.
Since everybody has a different 3D Printer and therefore needs a different 3D Printed Adapter Housing, there is no point to 3D print the parts in-house and charge you extra money for that. This would just unnecessarily increase the overall Extruder price.
For this reason, I made it very easy for you to just 3D print the plastic Extruder parts yourself, which gives you the freedom to use my Extruder on a big variety of 3D Printers without the need to buy extra adapter parts.
Absolutely! Thanks to innovative features like the slide-mechanism to change pellets, the pellet extruder is quite easy to use. Compared to Filament 3D printing, the printing experience & process with pellets is basically the same and if you need help then soon you will find guides that will help you out, or you can ask questions in the Discord Community Server where we have already more than 1000+ members.
Absolutely! Thanks to innovative features like the slide-mechanism to change pellets, the pellet extruder is quite easy to use. Compared to Filament 3D printing, the printing experience & process with pellets is basically the same and if you need help then soon you will find guides that will help you out, or you can ask questions in the Discord Community Server where we have already more than 1000+ members.
Yes, it also works with masterbatch coloring pellets, but I would add a little bit more masterbatch, than you typically would the get 100% consistent color because the overall length of the meltzone is relatively short which is great for recycling plastic since a smaller meltzone reduces degradation of the plastic.
In its “Stock Version” 330c.
But the Extruder can be further upgraded if people want to print at temperatures up to 420 °C.
How can it be upgraded?
1) By 3D printing the plastic Extruder parts out of a more heat-resistant plastic like PETG, ABS/ASA, PC, or NYLON CF… (The more temperature resistance the plastic provides the higher you can go up in Extruder temperature)
2) By insulating the heating block with an insulation. For example, wrapping aluminum foil around the aluminum heating block, reduces heat conducting away through air and therefore allows the Extruder to reach higher temperatures up to 420 °C.
3) Keep in mind that the stock temperature sensor is made for max. temperature measurements of 350 °C. If you want to print at higher temperatures (up to 420 °C) then I recommend replacing the stock temperature sensor with one that can handle higher temperatures like the “PT1000 Thermistor” which I use myself.
In the future, I plan to create a more detailed tutorial on this “High-Temperature” upgrade.
The Slicer settings are almost the same as with Filament Extruders. There are only some very minor changes in the slicer settings, like a higher value for the retraction distance, but you don’t have to worry about that because there will be “ready to use” Slicer profiles for different nozzle sizes and materials, which are going to make your “Pellet Extruder” journey more comfortable.
+ There will be a tutorial in the future, where I explain the minor changes, so that you can customize the settings to your specific needs, if you like to.
Yes! Orders are fulfilled and shipped globally.
Yes! You will get an installation guide + manual in text and video format.
The best way is:
1) to loosen the screws that hold the extruder motor in place
2) then to heat up the extruder so that you can pull out the screw along with the motor
3) then you quickly remove the plastic from the screw with the help of a “pliers” like tool, as long it stays hot, and the plastic is soft (If needed the screw can be inserted back into the hot extruder barrel, so that the plastic can become soft again)
4) After the screw is cleaned, you take a 12mm drill bit and gently drill out the remaining molten/very soft plastic out of the extruder barrel using your hands
That’s basically it.
Of course, you can also just purge for example PETG out with PLA. (Remember the actual melt zone is only 20mm long, not that long like in a big injection molding machine, which makes this possible)
I do this very often when I want to changes the currently “loaded” plastic with one that is very similar in its melt point. However, when the plastic you want to change has a significantly higher or lower melt point, then the “manual cleaning process” I mentioned above is inevitable
I will make a video about this “manual cleaning process” in the future to make things easier for you
The max print rate is actually capped by the max rotation speed of the extruder motor in combination with the Extruder stepper driver and the overall used voltage (24V , 48V etc).
For example the Ender 3 V2 which is the 3D printer I used in my videos is a cheap low end 3D printer and while it has silent stepper drivers they are quite weak in performance and can only barely provide 1,3 Amps of power to the extruder motor at 24 Volt. I designed the Pellet Extruder in a way that you can still use it on such “low end 3D printers”, to make it as universal as possible. This also means that the stated data on my website regarding to the max extrusion rate of 125 to 200 grams per hours is based on extensive tests on the Ender 3 V2. Because When you can reach such values on an Ender 3 V2 you will very likely reach these values with any 3D printer.
When it comes to the max extrusion rate on the Ender 3 V2 in its “Pellet Extruder upgraded form”, then the following problem occurred when I tried to exceed the max extrusion rate:
1) The Extruder stepper driver (tmc2208) which is set to run at 1,3 Amps output (the max limit before it instantly shuts off to prevent overheating) shuts off because it can not handle the high speed + high Amps output which the stepper motor needs in order to achieve a higher extrusion rate. The stepper driver just shuts off to prevent over heating damage, and the extruder motor just stops working at all until you restart the 3D printer.
2) If you now have a 3D printer with a stepper driver that can handle higher Amp output such as for example 2 Amps without overheating, then there is a much higher limit until the stepper driver shuts off for safety reasons, which would allow reaching higher max extrusion rates.
3) Additionally, if your system runs at 48 Volts you may theoretically be able to almost double the max extrusion rate, because the additional Volts allow the Extruder Motor to run at higher speeds with a lot of torque loss.
Here Is a great explanation from “ChatGPT” about the “WHY”:
———
The decrease in torque of a stepper motor, such as a NEMA 17 running at 24V, at higher speeds is primarily due to several electrical and mechanical factors. Here’s a detailed explanation of why this occurs:
To mitigate torque reduction at higher speeds, several strategies can be employed:
Use a Higher Voltage Driver: Increasing the supply voltage (while ensuring compatibility with the motor and driver) can help overcome the inductive reactance and back EMF issues, allowing more current to flow at higher speeds.
Optimize Microstepping: Adjusting microstepping settings can help smooth out torque variations and improve performance.
Current Compensation: Some advanced drivers can compensate for decreased current at higher speeds by dynamically adjusting the voltage.
Mechanical Adjustments: Reducing load inertia, using gear reduction, or optimizing the mechanical setup can help maintain torque.
In summary, the decrease in torque with higher speed in stepper motors like the NEMA 17 is largely due to electrical characteristics such as inductance and back EMF, as well as mechanical factors. Understanding these principles can help in optimizing the performance of stepper motors for specific applications.
———–
In the end, it comes down to the fact that I don’t want to overpromise about the performance values. The given values a meant for Low-end 3D printers, to ensure that everyone can reach them.
Most Filament 3D printers are not optimized for the technical needs of a pellet extruder, but they still work quite well when upgraded with them. If one would design a 3D printer specifically to be a great Pellet 3D printer, then this would significantly increase the capabilities of the same Pellet Extruder used on a Filament 3D Printer. Maybe in the future I am going to develop a low-cost Pellet 3D Printer, but only if I manage to gather more resources, for example through the current ongoing pre-orders…
Yes! absolutely by:
1) Putting for example 50% PLA pellets (ideally transparent ones) + 50% of color powder or something similar into the extruder.
2) Extrude that stuff in mid air to get a string of filament, so its mixed together
3) cut or shred that filament into smaller pellets/particles (either by a machine, blender or scissors)
4) And finished is your custom-made colored masterbatch, that you can mix with raw material to get a desired color or effect
That is more or less exactly how the big boys are doing it, just on a larger scale with bigger machines, so why shouldn’t you be able to do the same?
Additionally: Let’s say you made yourself some black colorant/masterbach pellets.
By mixing it with raw pellets, you can achieve anything from light gray to pitch black color by testing different percentages of colorant you added.
Once you find the right combination for example adding 3% colorant to get dark gray color, you can save this recipe and create a couple of kilograms of your dark gray pellet recipe or whatever amount you need for your specific project.
© 2024 Greenboy3D Kristian Friesen – Altenkamp 1, 33758 Schloß Holte-Stukenbrock – GERMANY | Legal Info


